
 |
| Four Motor Robot |
After the connection
made for the Chassis, Motor and Wheels, finished robot will look like:
 |
| Complete Robot |
DPDT SWITCHES USING CIRCUIT:-
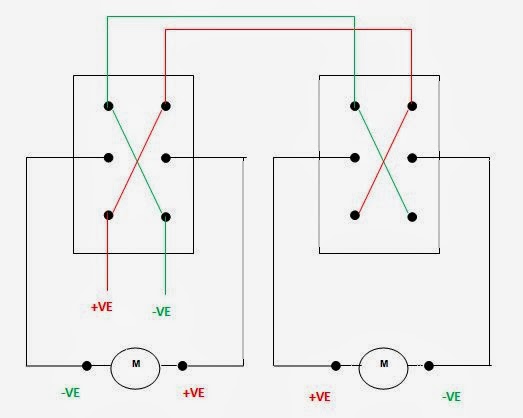 |
| Two switch connection for DPDT switch |
CIRCUIT CONNECTION:-
 |
| Switch Circuit Connection |
The
motors are fixed to the chassis and the Wheels are fitted to the DC Geared
Motors
4x4 and 4x2 Outdoor or indoor.
4x4 and 4x2 Outdoor or indoor.
USING ROBOT CONTROL:-
After designing control
wired we have to learn basic movement of robot which is shown in following
table.
Movements
|
Motor1 (left)
|
Motor2(right)
|
For moving
forward
|
Clockwise
|
Clockwise
|
For moving
backward
|
Anticlockwise
|
Anticlockwise
|
For turning
left
|
Off
|
Clockwise
|
For turning
right
|
Clockwise
|
Off
|
CONTROLS:-
The following switch
positions will give you the respective movement.
Left-DPDT switch
|
Right-DPDT switch
|
Movement
|
TOP
|
TOP
|
Forward
|
BOTTOM
|
BOTTOM
|
Reverse
|
–nil–
|
TOP
|
Left
|
TOP
|
–nil–
|
Right
|
TOP
|
BOTTOM
|
360 right
|
BOTTOM
|
TOP
|
360 left
|
AFTER FINISHING THE CONNECTIONS:-
 |
| After Complete Connection |
AFTER FINISHING THE WHOLE DESIGN THE ROBOT:-
 |
| Completed Robot |
Thanks for reading ......comment your queries.....
No comments:
Post a Comment